|
|
 |
 |
• • -HUDtoggle Command- • • • • •
|
|
hudtoggle
Allows you configure your client hud. It won't affect what other players see on the game.
It writes the changes on your user.ini file. Menus are made to be more user-friendly than variables on an ini file. Even better, if you install 140 files locally you will
have a graphical menu on your Mods Menu.
Calling an option without value specified will return the current value &/or options for it.
Calling a boolean (variable accepting only True or False as values) will turn it from True to False, or viceversa, and shows the new value.
Navigation through the command's options explained on this scheme.
hudtoggle can be used to load presets, defined to show some of the features on 140, and restore default settings if needed...
hudtoggle 0 => restores all the default/original values.
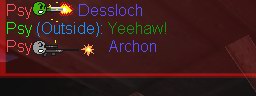
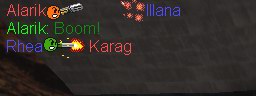
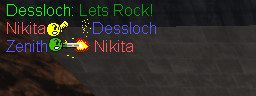
hudtoggle 1 => Enables icons and new death messages. Kill msgs will look like: Killer :weapon_icon: Killed.
hudtoggle 2 => Enables icons, new death messages, a sample font/size/colour and expands chatbox to 64,128,96,128.
This means chatbox size will be 64 pixels in mid game (original) and expanded to 96 if needed to make room for more messages), and 128/128 for end game sequence.
Examples:
hudtoggle icons disableemotes => will enable/disable all the icons and colours.
hudtoggle deathmsg useicons => will enable/disable new death msgs with icons.
|
|
|
|
 |
• • Updated by No-one - January 02, 2005• • • • •
|
 |
|
|
|
|
|
• • -Icons- • • • • •
|
|
The new icon pack comes in the form of an extra texture file. Anemote1.utx.
The file is 9.5 mb long (barely 300 Kb compressed tho) but size ain't a problem since it's totally clientside and optional.
You don't need to install the file on the servers, it won't be sent to clients on join if they didn't have it.
It's your choice to install the texture file or not. If you don't, you just won't see any icon in game, no other side effects.
All the colours, fonts and icons stuff is disabled by default. Your UT will look exactly as it did before, unless you want to change it.
The list of available icons and colours is stored on a file on your UT's system folder, anemote.ini, created the first time you join a 140 server or load menus.
(It may freeze your UT a couple of seconds the first time, while it's generating and saving the file).
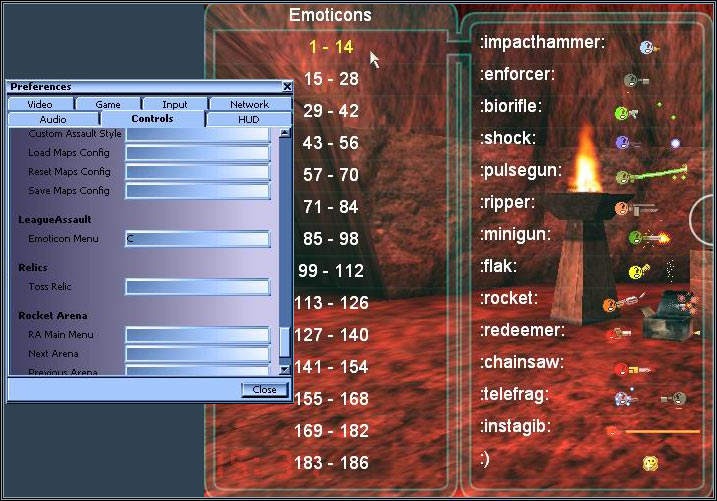
All the icons (except the weapons, first 14) use the same code as forums, familiar for most of you :)
| anemote1.00_sniper01 | => | :sniper: |
| anemote1.01_impact1 | => | :impacthammer: |
| anemote1.02_enforcer1 | => | :enforcer: |
| anemote1.03_biorifle1 | => | :biorifle: |
| anemote1.04_shock01 | => | :shock: |
| anemote1.05_pulsegun01 | => | :pulsegun: |
| anemote1.06_ripper01 | => | :ripper: |
| anemote1.07_minigun1 | => | :minigun: |
| anemote1.08_flak01 | => | :flak: |
| anemote1.09_rocket01 | => | :rocket: |
| anemote1.0A_redeemer01 | => | :redeemer: |
| anemote1.0B_chainsaw1 | => | :chainsaw: |
| anemote1.0C_telefrag01 | => | :telefrag: |
| anemote1.0D_instagib01 | => | :instagib: |
| anemote1.10_smile1 | => | :) |
| anemote1.11_frown | => | :( |
| anemote1.12_indiffe | => | :| |
| anemote1.13_ohwell | => | :\ |
| anemote1.14_block1 | => | :] |
| anemote1.15_block2 | => | :[[ |
| anemote1.16_biggrin | => | :D |
| anemote1.17_tongue1 | => | :P |
| anemote1.18_redface | => | :o |
| anemote1.19_greenli1 | => | :p |
| anemote1.20_sick | => | :x |
| anemote1.afro | => | :afro: |
| anemote1.angel | => | :angel: |
| anemote1.angry01 | => | :angry: |
| anemote1.annoyed | => | :annoyed: |
| anemote1.argue01 | => | :argue: |
| anemote1.arsemiss01 | => | :arsemiss: |
| anemote1.bah1 | => | :bah: |
| anemote1.balloon | => | :balloon: |
| anemote1.ban | => | :ban: |
| anemote1.banana1 | => | :banana: |
| anemote1.bandit1 | => | :bandit: |
| anemote1.banghead1 | => | :banghead: |
| anemote1.barf01 | => | :barf: |
| anemote1.bawling01 | => | :bawling: |
| anemote1.bday1 | => | :bday: |
| anemote1.beer1 | => | :beer: |
| anemote1.bj01 | => | :bj: |
| anemote1.blackeye | => | :blackeye: |
| anemote1.boozer01 | => | :boozer: |
| anemote1.bounce01 | => | :bounce: |
| anemote1.bow1 | => | :bow: |
| anemote1.bowdown1 | => | :bowdown: |
| anemote1.boxing1 | => | :boxing: |
| anemote1.bunny | => | :bunny: |
| anemote1.burp01 | => | :burp: |
| anemote1.caek01 | => | :caek: |
| anemote1.calm | => | :calm: |
| anemote1.chilled1 | => | :chilled: |
| anemote1.clap1 | => | :clap: |
| anemote1.confused | => | :confused: |
| anemote1.cool | => | :cool: |
| anemote1.coolfip1 | => | :coolfip: |
| anemote1.copcar | => | :copcar: |
| anemote1.cow | => | :cow: |
| anemote1.crap | => | :crap: |
| anemote1.crazy1 | => | :crazy: |
| anemote1.cuddle01 | => | :cuddle: |
| anemote1.chase01 | => | :chase: |
|
| anemote1.chicken | => | :chicken: |
| anemote1.deal01 | => | :deal: |
| anemote1.devil | => | :devil: |
| anemote1.dj01 | => | :dj: |
| anemote1.dog | => | :dog: |
| anemote1.done | => | :done: |
| anemote1.drool001 | => | :drool: |
| anemote1.drool201 | => | :drool2: |
| anemote1.drummer1 | => | :drummer: |
| anemote1.dunce | => | :dunce: |
| anemote1.eek01 | => | :eek: |
| anemote1.evil | => | :evil: |
| anemote1.eyeroll01 | => | :eyeroll: |
| anemote1.fart01 | => | :fart: |
| anemote1.fight1 | => | :fight: |
| anemote1.fingers1 | => | :fingers: |
| anemote1.fish | => | :fish: |
| anemote1.flame01 | => | :flame: |
| anemote1.flyer01 | => | :flyer: |
| anemote1.footy1 | => | :footy: |
| anemote1.freak01 | => | :freak: |
| anemote1.gay | => | :gay: |
| anemote1.grouphug | => | :grouphug: |
| anemote1.guitar1 | => | :guitar: |
| anemote1.hammer1 | => | :hammer: |
| anemote1.hm | => | :hm: |
| anemote1.hump1 | => | :hump: |
| anemote1.imu01 | => | :imu: |
| anemote1.jd | => | :jd: |
| anemote1.jester | => | :jester: |
| anemote1.joystick01 | => | :joystick: |
| anemote1.kiss01 | => | :kiss: |
| anemote1.cat1 | => | :cat: |
| anemote1.lick01 | => | :lick: |
| anemote1.loaded | => | :loaded: |
| anemote1.lol1 | => | :lol: |
| anemote1.love1 | => | :love: |
| anemote1.llama | => | :llama: |
| anemote1.mad | => | :mad: |
| anemote1.martian1 | => | :martian: |
| anemote1.mic1 | => | :mic: |
| anemote1.mischief01 | => | :mischief: |
| anemote1.moon01 | => | :moon: |
| anemote1.moon201 | => | :moon2: |
| anemote1.mosher1 | => | :mosher: |
| anemote1.mushroom1 | => | :mushroom: |
| anemote1.mwah | => | :mwah: |
| anemote1.nag1 | => | :nag: |
| anemote1.nana1 | => | :nana: |
| anemote1.naughty1 | => | :naughty: |
| anemote1.nod1 | => | :nod: |
| anemote1.nono1 | => | :nono: |
| anemote1.nurseoap01 | => | :nurseoap: |
| anemote1.ola01 | => | :!ola: |
| anemote1.paddy | => | :paddy: |
| anemote1.party | => | :party: |
| anemote1.party2 | => | :party2: |
| anemote1.paw | => | :paw: |
| anemote1.pig | => | :pig: |
| anemote1.pimp1 | => | :pimp: |
| anemote1.poke1 | => | :poke: |
| anemote1.prooap01 | => | :prooap: |
| anemote1.psycho1 | => | :psycho: |
| anemote1.puke01 | => | :puke: |
|
| anemote1.redeye01 | => | :redeye: |
| anemote1.rodent | => | :rodent: |
| anemote1.rofl01 | => | :rofl: |
| anemote1.rolleyes01 | => | :rolleyes: |
| anemote1.rolling01 | => | :rolling: |
| anemote1.rub01 | => | :rub: |
| anemote1.satan1 | => | :satan: |
| anemote1.saw01 | => | :saw: |
| anemote1.scared01 | => | :scared: |
| anemote1.scream1 | => | :scream: |
| anemote1.shake01 | => | :shake: |
| anemote1.shout1 | => | :shout: |
| anemote1.smash1 | => | :smash: |
| anemote1.smoke01 | => | :smoke: |
| anemote1.smoke201 | => | :smoke2: |
| anemote1.smurf | => | :smurf: |
| anemote1.snore01 | => | :snore: |
| anemote1.snore01 | => | :sleep: |
| anemote1.snowdrunk | => | :snowdrunk: |
| anemote1.snowemb | => | :snowemb: |
| anemote1.snowgrin | => | :snowgrin: |
| anemote1.snowsmil | => | :snowsmil: |
| anemote1.snowton | => | :snowton: |
| anemote1.snowwink | => | :snowwink: |
| anemote1.sofa01 | => | :sofa: |
| anemote1.soon | => | :soon: |
| anemote1.spam | => | :spam: |
| anemote1.spank1 | => | :spank: |
| anemote1.sperm1 | => | :sperm: |
| anemote1.spider01 | => | :spider: |
| anemote1.spin1 | => | :spin: |
| anemote1.spit01 | => | :spit: |
| anemote1.spock1 | => | :spock: |
| anemote1.spockfla01 | => | :spockfla: |
| anemote1.stompa1 | => | :stompa: |
| anemote1.stupid | => | :stupid: |
| anemote1.takeit | => | :takeit: |
| anemote1.talk01 | => | :talk: |
| anemote1.tank1 | => | :tank: |
| anemote1.tasty01 | => | :tasty: |
| anemote1.teehee01 | => | :teehee: |
| anemote1.threesome1 | => | :3some: |
| anemote1.throw01 | => | :throw: |
| anemote1.thumb | => | :thumb: |
| anemote1.tired | => | :tired: |
| anemote1.topic | => | :topic: |
| anemote1.trout01 | => | :trout: |
| anemote1.uhh1 | => | :uhh: |
| anemote1.user1 | => | :user: |
| anemote1.wanker01 | => | :wanker: |
| anemote1.wave1 | => | :wave: |
| anemote1.weirdobeer1 | => | :weirdobeer: |
| anemote1.whatever | => | :whatever: |
| anemote1.whip01 | => | :whip: |
| anemote1.wink1 | => | :wink: |
| anemote1.wow1 | => | :wow: |
| anemote1.wtf1 | => | :wtf: |
| anemote1.yawn01 | => | :yawn: |
| anemote1.yawn201 | => | :yawn2: |
| anemote1.yipee1 | => | :yipee: |
|
Options for icons:
These can be found on your user.ini file, and will be written the first time you join a server running LeagueAS140.
Best method to modify these settings, and further explanation can be found in the HUDtoggle command scheme.
Listed values are default properties.
[LeagueAS140.LeagueAS_HUD]
bNoOffensiveEmotes=False => Enables/Disables offensive icons.
MaxSizeEmotes=256 => Sets the upper limit for the icons displayed on your screen. Setting this value to 0 will disable icons but not colours.
bOnlyTeamSayEmotes=False => Disables globalsay icons (protection vs spam).
bNoFormatting=True => Completely disables all the icons and colors when set to True.
bRemoveEmotes=False => Disables icons and removes icon codes typed on the chatbox.
bRemoveColors=False => Disables colors and removes color codes typed on the chatbox.
bSqueezeEmotesWhenChatFull=True => Will squeeze icons when needed to make room for more messages.
bSqueezebeforeExpand=True => Will set preference to squeezing icons instead of expanding the chatbox to make room for more messages.
Commands in game:
hudtoggle icons noofensiveemotes
hudtoggle icons maxsizeemotes 256
hudtoggle icons onlyteamsayemotes
hudtoggle icons disableemotes
hudtoggle icons removeicons
hudtoggle icons removecolors
hudtoggle icons squeezeemoteswhenchatfull
hudtoggle icons squeezeemotesbeforeexpandchat
Menu:
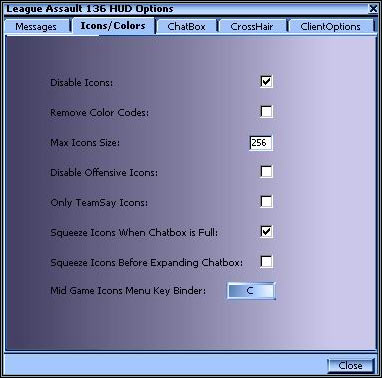
Contains on bottom a KeyBinder for Icons menu in game. It works like Speech Voice menu (V key by default).
Also added to Preferences->Controls:
|
|
|
|
|
|
• • Updated by No-one - January 02, 2005• • • • •
|
|
|
|
|
|
|
• • -Colours- • • • • •
|
|
Colours are defined on the same Anemote.ini file on your UT's system folder.
Using colors requires to set on your user.ini file
[LeagueAS140.LeagueAS_HUD]
bNoFormatting=False => It will enable icons as well. Default value is True.
You can assign colours to different types of messages (view HUDtoggle command scheme, and bottom section of this document for further info)
Color codes can also be used in game and combined with other leagueas codes.
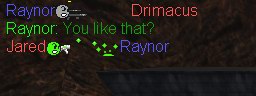
Example: Ready to launch :&LR: %nearestteammate% :&LG: at :&Y: (%location%)
| Psy:
Ready to launch Polle
at (Base
entrance) |
Or insert weapon icons in these kind of binds. Use your imagination ;)
hudtoggle colorlist => shows list of color codes in game.
Color
Index |
Color
Code in game |
RGB |
Model |
| 235 |
:&W: |
(R=255,G=255,B=255) |
|
| 236 |
:&LR: |
(R=255,G=0,B=0) |
|
| 237 |
:&LG: |
(R=0,G=255,B=0) |
|
| 238 |
:&LB: |
(R=0,G=0,B=255) |
|
| 239 |
:&LC: |
(R=0,G=255,B=255) |
|
| 240 |
:&Y: |
(R=255,G=255,B=0) |
|
| 241 |
:&LM: |
(R=255,G=0,B=255) |
|
| 242 |
:&R: |
(R=128,G=0,B=0) |
|
| 243 |
:&G: |
(R=0,G=128,B=0) |
|
| 244 |
:&B: |
(R=0,G=0,B=128) |
|
| 245 |
:&C: |
(R=0,G=128,B=255) |
|
| 246 |
:&BR: |
(R=128,G=128,B=0) |
|
| 247 |
:&M: |
(R=128,G=0,B=128) |
|
| 248 |
:&TR: |
(R=255,G=64,B=64) |
|
| 249 |
:&TG: |
(R=64,G=255,B=64) |
|
| 250 |
:&TB: |
(R=64,G=64,B=255) |
|
| 251 |
:&TC: |
(R=64,G=255,B=255) |
|
| 252 |
:&TBR: |
(R=255,G=255,B=64) |
|
| 253 |
:&TM: |
(R=255,G=64,B=255) |
|
| 254 |
:&BK: |
(R=1,G=1,B=1) |
|
| 255 |
:&GY: |
(R=128,G=128,B=128) |
|
Options for colours...
...can be found on your user.ini file. The default values will be written the first time you join a server running LeagueAS140.
Best method to modify these settings, and further explanation can be found in the HUDtoggle command scheme.
Listed values are default properties.
[LeagueAS140.LeagueAS_HUD]
MaxSizeEmotes=256 => Sets the upper limit for the icons displayed on your screen. Set to 0 will disable icons but not colours.
bNoFormatting=True => Completely disables all the icons and colors when set to True.
bRemoveEmotes=False => Disables icons and removes icon codes typed on the chatbox.
bRemoveColors=False => Disables colors and removes color codes typed on the chatbox.
Commands in game:
hudtoggle icons maxsizeemotes 256
hudtoggle icons useicons
hudtoggle icons removeicons
hudtoggle icons removecolors
|
|
|
|
|
|
• • Updated by No-one - January 02, 2005• • • • •
|
|
|
|
|
|
|
• • -Crosshairs- • • • • •
|
|
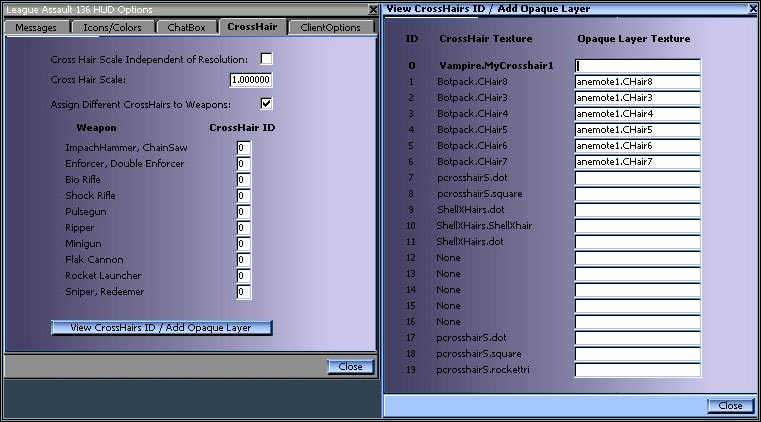
Advanced Crosshairs:
You can assign different crosshairs to different weapons by setting on your user.ini:
[LeagueAS140.LeagueAS_HUD]
bAdvancedCrosshairs=True (Default is False)
Example: Check the IDs of the crosshairs you have installed on your unrealtournament.ini
[Botpack.ChallengeHUD]
CrosshairCount=2
CrossHairs[0]=ShellXHairs.ShellXhair
CrossHairs[1]=Vampire.MyCrosshair1
CrossHairs[2]=Botpack.CHair4
CrossHairs[3]=Botpack.CHair8
CrossHairs[4]=pcrosshairs.dot
CrossHairs[5]=Botpack.CHair6
CrossHairs[6]=Botpack.CHair7
CrossHairs[7]=pcrosshairs.square
CrossHairs[8]=
CrossHairs[9]=
CrossHairs[10]=
CrossHairs[11]=
....
I want my dot (4) for sniper, the square (7) for Rocket Launcher & Shock Rifle, and Vampire(1) for the rest.
I assign the crosshair IDs to CrossHairGroup[x], where 'x' is the number/group of the weapon.
Accordingly, I modify the [LeagueAS140.LeagueAS_HUD] section of my unrealtournament.ini so it looks like this:
[LeagueAS140.LeagueAS_HUD]
bAdvancedCrosshairs=True
| CrossHairGroup[0]=1 | (No weapon) |
| CrossHairGroup[1]=1 | (Impact Hammer, Chainsaw) |
| CrossHairGroup[2]=1 | ((Double) Enforcer) |
| CrossHairGroup[3]=1 | (Bio Rifle) |
| CrossHairGroup[4]=7 | (Shock Rifle) |
| CrossHairGroup[5]=1 | (Pulsegun) |
| CrossHairGroup[6]=1 | (Ripper) |
| CrossHairGroup[7]=1 | (Minigun) |
| CrossHairGroup[8]=1 | (Flak Cannon) |
| CrossHairGroup[9]=7 | (Rocket Launcher) |
| CrossHairGroup[10]=4 | (Sniper, Redeemer) |
Opaque Layer
You can add an extra opaque layer to your crosshairs by specifying a texture in OpaqueCrossHairs[x] on your user.ini, where 'x'
is the crosshair-ID in CrossHairs[x].
This way you can have a crosshair, for example, black and white, visible on bright surfaces.
Example: I created an opaque layer texture for my Vampire crosshair and saved it into the same texture package, named it "shadow".
Vampire is my crosshair [1], so I would set on my user.ini:
OpaqueCrossHairs[0]=
OpaqueCrossHairs[1]=Vampire.shadow
OpaqueCrossHairs[2]=
...
 |
 |
 |
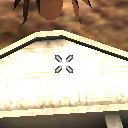 |
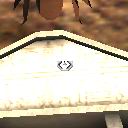
| anemote.CHair1 | anemote.CHair2 | anemote.CHair3 | anemote.CHair4 |
 |
 |
 |
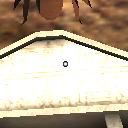 |
| anemote.CHair5 | anemote.CHair6 | anemote.CHair7 | anemote.CHair8 |
Creating your own opaque layer for your crosshairs is very easy, if you had some experience with unrealED and Image editors.
First export your crosshair texture to PCX using unrealED (go to texture manager, open the texture package, select the texture,
right click -> Export to PCX).
Open the PCX file with any good Image Editor.
Pure black colours (RGB=0,0,0) will be turned transparent in UT, otherwise your crosshair would be a big black square. (D'oh!)
Therefore, to make the shadow we need an "almost-black" colour, like RGB=8,8,8. It will be black in game.
You may need to edit the picture's color palette to allow this new colour.
Now you can paint your crosshair as you like, enhancing borders or making new shadows/shapes on it.
Do not resize nor change the colour depth of the pic or you will have problems to import into unrealED again.
Keep the size proportional to 16x16, 32x32, 64x64 etc, and always 256 colours.
When you are done, save as PCX and go back unrealED.
Import the new texture into the same texture package with a different name (if it was a small one), or create a new package for it.
Make sure you select to import as "Masked". That will remove the pure black colours from the texture and leave the rest, including our
"almost-black", your shadow :)
Finally, assign the texture in OpaqueCrossHairs[x] to your crosshairID.
Options for Crosshairs:
These can be found on your user.ini file. They will be written the first time you join a server running LeagueAS140.
Best method to modify these settings, and further explanation can be found in the HUDtoggle command scheme.
Listed values are default properties.
[LeagueAS140.LeagueAS_HUD]
| bAdvancedCrosshairs=False |
(When True, allows you to assign different crosshairs to different weapons) |
| CHairScale=1.000000 |
(Sets the draw scale for your crosshair. Default is 1.0) |
| bChairResIndependent=False |
(Makes crosshair size independent of the screen resolution. Scale equivalent to crosshair size at 1024x768) |
Commands in game:
hudtoggle chair UseAdvancedCrossHairs
hudtoggle chair CHairScale 1.0
hudtoggle chair CHairResIndependent
Menu
The right window pops up when pressing the button on the left image.
It will list your installed crosshairs.
It's useful to know IDs to assign to weapons on the first window, and it also allows you to assign an opaque layer texture easily.
Line in bold represents your current crosshair in use (ID 0 in my case).
|
|
|
|
|
|
• • Updated by No-one - January 02, 2005• • • • •
|
|
|
|
|
|
|
• • -Personalise- • • • • •
|
|
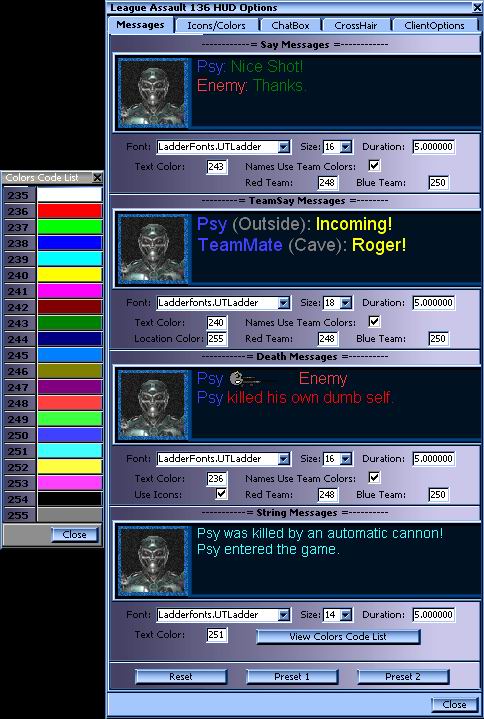
Best method is to use 140's awesome message manager menu!
You can find it on your Mods menu -> "LeagueAS 140".
Requires LeagueAS files locally installed on your computer, not downloaded from a server.
(Disclaimer: damn jpg's... pic quality is horrible, but you don't want to
download 10mb to watch this page, do you?)
IMPORTANT: Remember FontScheme must be set to MANUAL for changes on fonts types/sizes to make effect.
You can modify FontScheme on the same menu (3rd Tab, "ChatBox"), or by typing hudtoggle fontscheme manual in game, or loading Preset 2.
Menus is very easy to use as you can see, includes a list of color codes, a preview of the result for each kind of message + ALL the options
mentioned on this document.
On bottom you find 3 small buttons. They correspond to hudtoggle 0 (restore Defaults), hudtoggle 1 and hudtoggle 2 commands.
First one "Reset", restores all the original values, as if you were playing LeagueAS135.
Preset 1, enables Icons and New Death Messages (using icons and team colors).
Preset 2, enables Icons, New Death Messages, sets FontScheme to Manual + adjusts your chatbox and all your fonts sizes to your current
screen resolution.
Also colours your fonts... Teamsay messages will be outstanding, slightly bigger and colourful.
Fonts/colors can also be defined in mid game (via hudtoggle command, useful because you can bind it to keys), or via ini files, as following:
The first time you play on a 140 server, several sections will be added to your user.ini file:
(Most variables are common to all the sections, so I'll explain them only once
[LeagueAS140.NewTeamSayMessagePlus]
| LocationColorIndex=245 |
Defines color of Location info for Teamsay messages. |
| Duration=4.0 |
Duration in seconds for this kind of messages. |
| MessageFont=LadderFonts.UTLadder16 |
Font/size for this kind of messages. |
| DefColorIndex=243 |
Text color for this kind of messages. |
| DefNameColorIndex=237 |
Defines nick color for either team if bUseTeamColors is set to False. |
| bUseTeamColors=False |
If set to True, player nicks will use team color on this kind of messages. |
| RedColorIndex=248 |
Defines nick color for Red team players. Requires bUseTeamColors=True. |
| BlueColorIndex=250 |
Defines nick color for Blue team players. Requires bUseTeamColors=True. |
Colours are assigned by index. Check section 3 on this document for a list of colours/index, and section 4 for a list of fonts.
You can assign colours/fonts in the ini file, or rather using the hudtoggle command in game, to see how it looks.
The following commands correspond to the configurable variables for Teamsay messages listed above:
hudtoggle TeamSay LocationColor 245
hudtoggle TeamSay Duration 4
hudtoggle TeamSay MessageFont LadderFonts.UTLadder16
hudtoggle TeamSay MessageColor 243
hudtoggle TeamSay DefaultNameColor 237
hudtoggle TeamSay NameUseTeamColors
hudtoggle TeamSay RedNameColor 248
hudtoggle TeamSay BlueNameColor 250
Example: I want my teamsay messages to be yellow (index 240), my nick to use my team's color (blue, 250), and my font to be Tahoma Bold size 20.
I would set:
MessageFont=UWindowFonts.TahomaB20
bUseTeamColors=True
BlueColorIndex=250
DefColorIndex=240
OR in game, I would type:
hudtoggle TeamSay MessageFont UWindowFonts.TahomaB20
hudtoggle TeamSay NameUseTeamColors
hudtoggle TeamSay BlueNameColor 250
hudtoggle TeamSay MessageColor 240
"NameUseTeamColors" is a boolean, means its value can be only True or False. That's why I don't set a value for it in the command.
Calling it with the hudtoggle command will change its value, and show the new one. I presume it was False by default, hudtoggle turned it True.
Now my TeamSay messages look like this:

[LeagueAS140.NewSayMessagePlus]
Exactly the same as TeamSay messages, except these don't have Location, obviously.
hudtoggle commands would be like this:
hudtoggle SAY MessageColor 243
[LeagueAS140.NewStringMessagePlus]
String messages are console info messages (in white by default), players joining/leaving, autocannon kills etc.
These messages don't show player's nicks so bUseTeamColors, BlueColorIndex & RedColorIndex, has no use here.
hudtoggle commands would be like this:
hudtoggle STRINGMSG MessageColor 235
[LeagueAS140.NewMsgDeathMessagePlus]
Same as the rest, except:
RocketEmote=9
PulseEmote=5
HammerEmote=1
FlakEmote=8
SniperEmote=0
.....
Defines the icon number for kill messages with those weapons.
Check Anemote.ini created on your ut/system folder for a list of icon numbers, or by typing into console:
AlternativeDeathMsgs=False (Enables icons on kill messages if set to true.)
hudtoggle DEATHMSG useicons (Enables/Disables this feature as well)
Finally, if you fiddled with settings too much and don't like the result, remember 'hudtoggle 0' returns everything to original values.
You can also restore default values from 140 Menus->Messages->Reset.
Have fun.
|
|
|
|
|
|
• • Updated by No-one - January 02, 2005• • • • •
|
|
|
|
|
|